
Oak Lawn Epoxy Flooring grinds and finishes polished concrete floors in Oak Lawn, IL, serving surrounding cities including Chicago Ridge, Evergreen Park, Worth, Alsip and Bridgeview. With 20+ years spent working concrete with diamond tooling, we polish retail floors, offices, showrooms and residential slabs into a durable, low-maintenance finish with no coating sitting on top to peel.
Polished concrete is not a product that gets rolled on. It is the slab itself, ground flat through a sequence of progressively finer diamonds, hardened with a densifier and burnished to a sheen. That makes the quality of the existing concrete, and the patience of the grinding sequence, the two things that decide how the floor looks.
Before we price a polish, we walk the slab, map patches and cracks, and grind a test area so you can see how much aggregate the floor will show. The proposal states the finish level, the grit sequence and the densifier we will use, so what you approved and what you receive are the same floor.
Commercial and Residential Polished Concrete
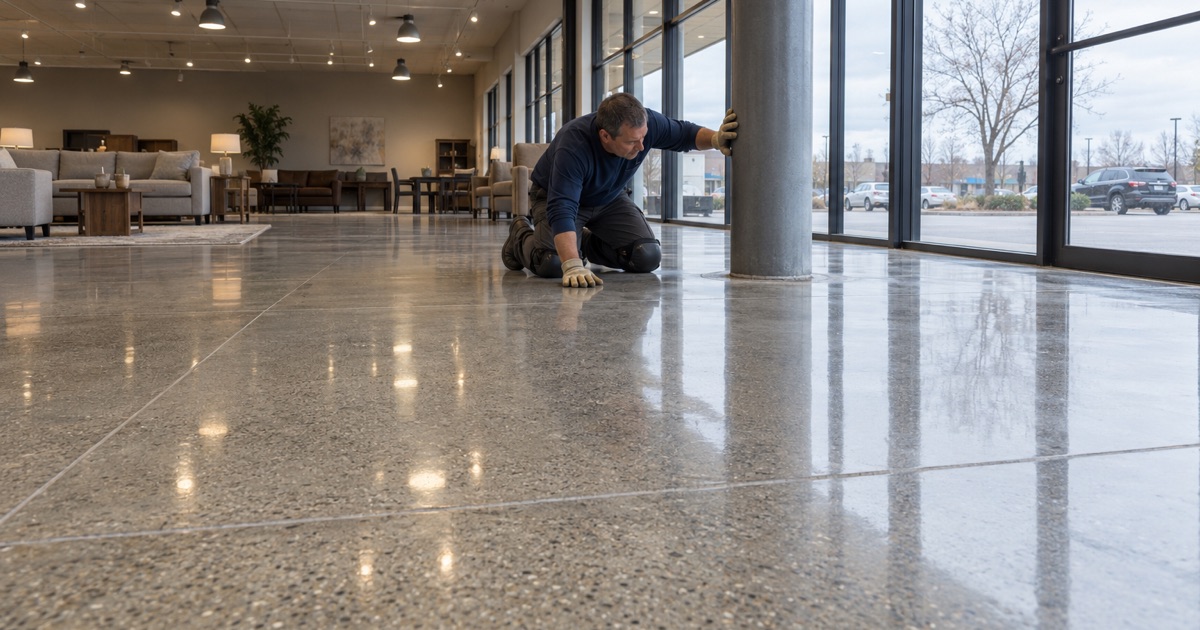
Retail Stores and Showrooms
Retail aisles and showrooms are the classic use for polished concrete. The floor takes carts, foot traffic and pallet jacks without a coating to scuff through, and an auto scrubber keeps it clean with water and a neutral cleaner. Car dealerships, furniture stores and big-box spaces choose it for exactly that low upkeep.
We stage retail work in sections when the store has to stay open, moving fixtures in sequence and grinding behind them. Dust is captured at the machine with vacuums, so merchandise and the open part of the sales floor are not coated in powder.
Offices, Clinics and Lobbies
Offices and medical buildings choose polished concrete for a clean, modern look that holds up to rolling chairs and daily cleaning. Lobbies often pair a high-sheen polish with saw-cut borders or dyed accents, giving the space a designed finish without carpet or tile seams.
Where a clinic cleans with strong disinfectants, we talk through which chemicals the guard tolerates. Polished concrete handles most routine cleaning, but a floor exposed to frequent harsh chemicals may be better served by a seamless coating.
Basements and Living Spaces
In homes, polished concrete suits finished basements, mudrooms and open living areas that want an industrial look. It works with radiant floor heat, holds up to pets and furniture, and never needs a replacement carpet after a minor water event.
Basement slabs need a moisture conversation first. Polished concrete breathes better than a film coating, but efflorescence and damp patches still show through, so we test and explain what the floor will look like before you commit.
Older basement floors also tend to carry paint, patching and tile adhesive from earlier remodels, all of which has to come off before polishing. Those floors are rarely as uniform as a new commercial slab, so we set expectations honestly: the result is a character floor with visible history, which many owners like and some would rather cover with a coating instead.
Finish Levels and Aggregate Exposure
Cream, Salt and Pepper, or Full Aggregate
How deep we grind decides how much of the slab’s stone shows. A cream finish stays in the top paste and shows almost no aggregate; a salt-and-pepper finish exposes fine sand and small stone; and a full aggregate finish cuts deep enough to show the larger stone across the floor.
The deeper the grind, the more variation the floor reveals, including patches, trowel marks and uneven stone. That is why the test area matters, because no one can predict exactly what a particular slab holds until the diamonds open it up.
Matte, Satin and High-Gloss Sheens
The final grit and burnishing step decide the sheen. A lower grit leaves a matte or satin look that hides wear well, while higher grits produce a reflective, high-gloss floor that bounces light around a showroom or lobby.
We match the sheen to the use. A warehouse or back-of-house floor rarely needs high gloss, while a retail entry often benefits from it, and the proposal names the final grit so the finish is defined in writing.
Sheen also changes how a floor shows dirt and wear. High gloss highlights dust, footprints and scratches in traffic lanes, while satin forgives them, so a busy retail aisle often looks better day to day with a slightly lower sheen than the one that looked best on the sample.
Dyes, Borders and Saw-Cut Designs
Penetrating dyes can be applied between grinding passes to tint the whole floor or to color borders, logos and zones. Saw cuts can divide the floor into a grid or frame a feature, and existing control joints can be turned into part of the design rather than fought.
Logos and wayfinding marks are laid out on the slab before dye goes down, then cut or masked so the edges stay crisp. Because dye sits inside the concrete rather than on top of it, a dyed border does not wear off in a traffic lane the way paint or a thin coating would, though strong sunlight can fade it slowly over the years.
Our Polished Concrete Process
Step 1: Inspect, Test and Repair
We walk the slab, note old adhesives, coatings and patches, and grind a test area. Cracks and spalls are filled with a repair material matched as closely as practical to the surrounding concrete, so they read as part of the floor rather than a scar.
This is also when old carpet glue, tile mastic and paint are identified. Some adhesives load up the diamonds and smear rather than grinding cleanly, and older black mastic may need testing before it is disturbed at all, so the removal plan is settled before the heavy grinding begins rather than discovered halfway across the floor.
Step 2: Coarse Grinding
Metal-bond diamonds cut through the surface paste, remove old coatings and flatten high spots. This is the stage that decides aggregate exposure, so it is done in planned passes with dust vacuums connected directly to the grinder.
Flatness is set here too. High spots and lippage at joints are ground down while the tooling is aggressive, because the finer resin diamonds that follow only refine the surface and cannot fix a floor that rolls. A slab that is flat after coarse grinding polishes evenly; one that is not shows bright and dull patches forever.
Step 3: Densifying
A lithium silicate densifier is applied to react with the concrete and harden the surface. A denser slab polishes to a better sheen, resists abrasion and creates less dust over its life, which is why the step is never skipped.
The densifier needs time to react before polishing continues, and the slab has to be clean of slurry when it goes down so it reaches the concrete rather than sitting in dust. We apply it at the stage the product calls for and let it work, instead of spraying it on at the end as a cosmetic shine.
Step 4: Honing and Polishing
Resin-bond diamonds refine the scratch pattern through progressively finer grits until the floor reaches the agreed sheen. Each pass has to remove the scratches from the one before, and skipping grits is what leaves visible swirls under store lighting.
Edges and corners are polished with hand tools to match the field of the floor, since a large machine cannot reach the last few inches along a wall. A finished floor where the perimeter looks dull next to a glossy center is the clearest sign of a rushed polish, and we check those edges before moving on.
Step 5: Guarding and Burnishing
A penetrating guard is applied and burnished in with a high-speed machine to improve stain resistance and lift the shine. We walk the finished floor with you and leave cleaning instructions, so the maintenance matches the finish rather than wearing it down.
Over the years, a polished floor wears dull in its busiest lanes before anywhere else. Instead of regrinding the whole slab, those lanes can be rehoned with fine diamonds and reguarded, which brings the sheen back for a fraction of the original cost and keeps the floor in service while it is done.
- 20+ Years Coating Concrete
- Moisture Tested Before Pricing
- Free Written Estimates